Inside our Unexpected Modern Scandi Basement Reno - Home Office Design
- ramee6
- Apr 17, 2023
- 7 min read
Hi there! Long time no blogging, I know.
I’m back and ready to give you a regular dose of behind the scenes on client projects, my own home projects, designer tips, and sharing some of my inspiration and favorite things.
So much to catch up on, but let's get started with a little funny—not so funny slice of my life!
Back in August I was finally getting to that perpetually next week chore of shampooing the basement carpet. It's a big one too, spread throughout our family room, office area, and main bedroom (Basement main bedroom, I hear you wondering. A story for another time!).
As I shuffled around the furniture, I rediscovered a section of bare floor hidden under the sofa I had forgotten about. The previous owners had left a bulky cabinet there and when I moved it, that surprise hole in the carpet reared its ugly head. I must have decided it was future Ramee’s problem as my sofa sat nicely over it and successfully accomplished out of sight, out of mind status.
I pointed it out to my hubby and said that whenever we do consider selling, we'll have to repair the carpeting. No new owner would be happy with the same surprise we had. We initially discussed how we’d need to plan and budget for that next year, once we got the million other projects finished, which then sparked a dream-filled convo about how we’d rearrange our bedroom, create a walk-in closet/dressing room and even a cool office revamp while we were at it.
Feeling pretty good about the future plans and having finally ticked one massive chore off my list, the hole in the carpet returned to the realm of forgotten intentions.
Or so I thought. Flash forward to that rainy night. With the carpeting still damp from my heroic shampooing efforts, my hubby decided to be a trooper and sleep upstairs on the sofa to keep the dogs with him and off the damp floor. I said goodnight and retired to our room for a well deserved un-puppy-interrupted sleep. Already lost in a half-sleep euphoria, I stepped into the laundry room to drop my day clothes into the hamper and was jolted awake by two inches of cold water. The entire floor was flooded and a small waterfall was gushing from halfway up the front corner of our house! I tried not to disturb my hubby who had just settled the three dogs (including one large puppy) and do it myself. I really did try! But I realized that we were quickly forming a lake in our basement so I got him down to help. The water flowed across the laundry room, seeped under and along the walls of our bedroom, family room, office and studio, and was quickly spreading from there.
It was not fun.
After going through a mountain of towels and the surprise return appearance of our handy carpet cleaner (the shop vac died during a misadventure earlier that summer), I was able to suck up lots of water but it was still heavily saturated.
Needless to say, those basement makeover fantasies from earlier in the afternoon became our unexpected reality the very next day. We had a garbage bin delivered and that eternally forgotten hole in the carpet became a lot bigger as we ripped the whole darn thing out.
It’s been a process, and there are still odds and ends that need to be finished, as there always are, but many months later we’re nearly done. And I’m delighted to say, the very first area that was completed was my home office for R Design Studio!! (Yaaaaay! )
I’m an unwitting subscriber to the shoemaker’s children metaphor. I’m so busy helping other people have the homes they love that I often don’t have time for doing those things for my own home. Having said that, I don’t have very many pictures of my office before. It functioned very nicely for just me but, like the hole in the carpet, Future Me would eventually get around to it one day and I'll take those pictures then.
Well, time caught up with Future Me and now I have pictures worth showing! But first, my previous cozy little office space:


Home Office Before: with a one person desk and repurposed bookcases
I utilized some bookcase cabinets that my sister made for me years ago from my Toronto rental apartment days. I repainted them the same white as the walls and spray painted the pulls a nice satin gold. I had a light wood desktop from Ikea, outfitted with vintage hairpin legs spray painted black (that I may have pulled out of a dumpster from a neighborhood home during an estate clear out).
I loved that I had the desk on an angle and was able to face into the room towards the fireplace, as well as the family room.
But as R Design Studio grows, so too the office space! I needed another workstation as well as extra space to lay out plans, samples, paperwork and a second, larger monitor. Display shelving is very important (a workstation doesn’t have to look like a workstation), but age was catching up with the old bookcase cabinets and they were too heavy for the new floating vinyl plank wood flooring, so they had to go to make room for more desk space. I guess I’d have to treat myself to new display shelves. Lots to consider, so where should I begin?
THE PROCESS
Just as I do for my clients, the first step was to get clear on my needs and wants.
NEEDS | WANTS |
Space for one large monitor | Clean modern Scandi styling to create a light and bright workspace |
More room to spread out and review plans, drawings, and samples | Display for some of my pretty design books and personal decor |
Space for an extra workstation set-up for collaboration and easy review of screens | A movable small meeting table/work island if there is room |
Adjacent area for samples and supplier brochures needed regularly | Use items I already have where possible |
All-in-one-Printer and office supplies organized and accessible but in a separate area hidden from view | |
Space for inspirations and notes | |
Dry erase calendar and current project list for viewing | |
Pared down family filing area and accessible minimal paper copy business files | |
Budget friendly | |
DESIGN AND CONCEPT DEVELOPMENT
Now I have some fun and explore what look and style I wanted for this space, and while considering the updates happening to the family room and bedroom, and with the limitations of the space. What new and existing finishes would I like to incorporate? What would I like to change or add?
I put together a mood board of inspiration images of the look, layouts and details that appealed to me for my Modern Scandi office. It’s pretty clear the look and vision I’m after when you see the images together, don’t you think?

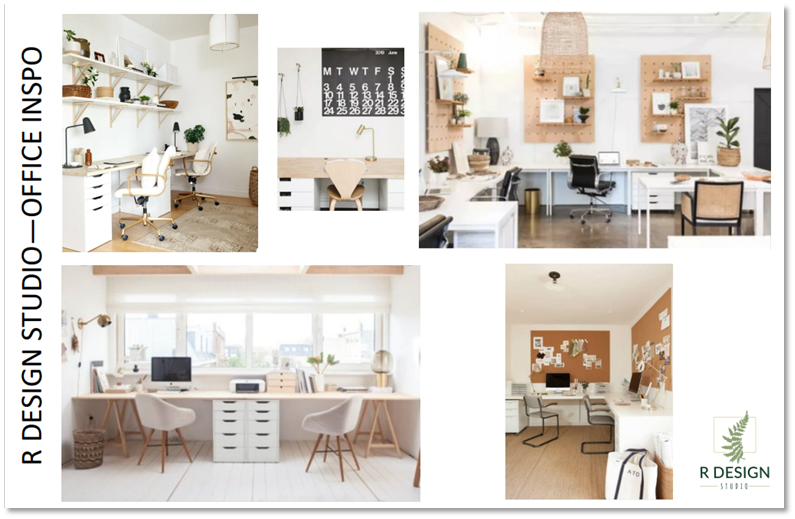
Inspiration Mood Board for my Home Office Design Studio
LETS GET PLANNING!
We don’t guess whether it will all fit. We need to properly measure and lay it out to make sure it will actually work. It’s important to do space planning to determine the possible and best layouts depending on your needs, wants, and of course, what the actual space allows. I played around with a few variations, and while I unfortunately didn’t have enough space and clearances to make an island or peninsula work, I came up with an office plan that took care of all my other needs and wants.
Designer Tip: It is preferred to have desks facing into the room and towards the entrance. However, with the more common use of multiple and large monitors, the computer workspace really needs to face a wall. When this is the case, it’s best to have the window adjacent for natural light and a view, but won’t distract with activity in your line of sight or cast extra glare on your screen. Also avoid having your back to the entrance. At the least have a 90 degree view, otherwise it can affect focus as we tend to be distracted with movement behind us that we can’t see.
Here's the office plan I came up with

The Open Home Office Plan
An ‘L’ shaped desk with lots of room for me to have my laptop and monitor, a return desk for all the drawings and paperwork, as well as an extra workspace for someone to work beside me when needed to make collaboration easier. There are storage drawers and filing drawers on either end and open shelves on the back wall that usually first draws your eye when you walk into the space. I'll face the wall but have the window (albeit a basement window) above to my right for a good dose of natural light. While I’m no longer facing the room entrance, it's in my peripheral view to the right.
The fireplace is behind and to my right, nice for heating me up on chilly days. Next to it is space for an extra desk surface which will provide an area for samples and binders with my calendar on the wall above. The big printer and office supplies are tucked away out of view in a nearby unfinished ‘Studio’ room. I’d rather walk the dozen or so steps to get a print rather than having it in the office area taking up precious space in the middle of the minimalist open concept room.
Designer Tip: Can you relocate or conceal the office equipment that you need? Whether in an adjacent room, a closet, custom cabinetry, or in a piece of furniture, try to find a home out of view for those bulky and unattractive office must-haves.
Finally it's about developing the design further. By combining the technical plan and layout with the mood boards, repurposing existing furniture, and sourcing new furniture I'll put together a design of my own that fits my look and minimal budget. The only addition that isn’t quite shown in the mood board is my personal decor. I'll incorporate blue and green accents in the pieces to make it more personal, add warmth and tie in with the family room beside it.


My Home Office Design Mood Board
As for the big reveal, you’ll have to wait for my next post.
I’ll share my sources, challenges, the result and how it’s all been working out!
Until then...
Yours in Design,
Ramee.


Comments