How we Saved Our Summer with a Stylish & Budget Friendly Patio Remodel
- ramee6
- Jul 26, 2023
- 9 min read
Updated: Jan 15, 2024
Aren't summers great? Sunshine, no snow, holidays, no snow, BBQs, no snow...but when you can't always pack up and hit the woods for camping or the beach for swimming, it's nice to have a backyard you can retreat to for some R 'n R. But like interior décor, your outdoor living space ca always use some updating from time to time. And like interior structures, sometimes outdoor structures need a little more TLC than you'd like. And that's where we found ourselves this Spring. Faced with a much needed update that turned into a much bigger project that threatened our summer of backyard relaxation.
Fortunately, it was resolved with a lovely, much appreciated remodel.
With a little creativity, some compromise and a lot of sweat we finally made it to the finish line with our Backyard Patio Update, and we couldn't be happier!
And be sure to watch the video of it all at the end of this post - photographs are great for taking in all the details, but videos give you the full immersive feeling of the space.
First, let's take you back to the Before and the what and whys of our patio update.
This is the Before when when I first moved in. The raised patio conceals a sand point well with the access point hidden somewhere behind the front garden steps. Despite access to city water, we've always preferred using the fresher well water, leaving us to work with (and around) this obstacle.


Before - When I bought the house in 2009
Over the years and many style iterations, fences and trees were removed, railroad ties repaired. A pergola, above ground pool (with deck) and greenery such as our wild ivy were all added and then removed.


My thrifty colourful boho phase - complete with pallet daybed


My transitional design phase with the ivy taking over
These were all great for a long time. But with time, all things change. Our first big step was in the Spring of 2021 when we said good-bye to our pool. It left a very large bare circle in the yard and while we considered re-seeding at first, we struck upon the idea of relocating and expanding the nearby firepit. We covered the area with a simple pea gravel fill, then layered mini-beltis stone around the old reliable tire rim in the center. Last year we added a mulched garden ring with river rock edging on either side to frame it.


Removing the pool and the firepit garden process 2021-2022
It turned out beautifully, but it really drew attention to the TLC our patio so desperately needed. The railroad ties were rotten and toad infested (really). The pavers were heaved, gapped and rampant with weeds. And, heartbreakingly, after ten years and unstable climate conditions, the pergola was almost done. It was going to need to come down but because of our old friend the sand point well, that created a significant complication: do we install a new raised patio or a deck? And should it be covered with some kind of pergola, awning, or shade? Pre-fab or do we build it as part of a deck?
With other projects on the go, we knew we'd need to push this complicated and progressively larger project (and budget) into next year. The pergola is a steel behemoth and the damage risk to a new paver stone or deck was too high if we dismantled it after installing a new patio. So, we'd have to go all in, ripping apart everything down to the well, losing most of our summer and easy access for our dogs to play in the yard. Or. How can we give this tired patio the update it deserves while making the least amount of physical impact...while making the biggest amount of visual impact?

This is the Design Assessment that we came up with:
Pergola: It will remain for one more year. We'll power wash it and safely secure the wind and weather battered structure.
Sandpoint Well: It's in there somewhere, along with a wall of cinder block on the front. Maybe with this update we will get a better sense of what's underneath for the full renovation in the future and help us decide between new deck or patio.
Railroad ties: They gotta go. Unfortunately, we can't finalize how we're going to re-do the structure of the raised patio until they're gone.
Raised Garden Beds: We want to use more rocks and stones with less plants and no mulch. High energy dogs, less maintenance and creating a sense of the northern landscape being the key factors. Not sure what to edge it with yet since this is a short-term solution and don't know what we are dealing with underneath.
Steps: Would love to re-do them entirely, but doesn't make sense with this short-term solution. If we can at least replace the top two steps on the front and conceal the side edges that would be amazing.
Planter Boxes: Design and build planter boxes for the front of the patio. This is for aesthetics but also to minimize those high energy dogs running down the garden edges and destroying everything as they chase each other!
Paver patio stones: Pull them up and re-lay them with new sand. Source extra pavers to tighten the gaps and give it a fresh look. We'll need to determine a pattern once we find the pavers.
BBQ: Relocate from the back corner of the patio to the side of the nearby shed. Ideally have a small piece of furniture in it's place for a surface and storage for outdoor dog toys.
Lighting: Remove the two worn rattan basket pendants, and hang our wedding string lights inside the pergola and maybe towards the shed. Replace with one center pendant of some kind.
Furniture: It's relatively new. Look at rearranging the existing furniture and freshen up the decor using as much as we can with what we already own. Future decking or patio stone colours could always be a factor.
As far as look, we wanted to extend the style and design elements we had already created in other areas of the yard, and add the spirit of the North that we love so much to create a cottage country getaway for us to enjoy only steps from our door.
The first arduous task was removing the old railroad tie garden tiers. Likely being almost as old as the house, they had rotted so thoroughly they had become a part of the landscape. I temporarily potted the plants I wanted to keep, then carefully excavated the wood, weeds, spikes and other detritus that had collected since 1968.


Spring 2023 railroad tie removal and temporary cinderblock barrier
We could now determine the slope we're left to work with. Because the aforementioned cinder blocks created a short, steep slope (hence the tiers) we decided to use larger rocks to edge, then fill with smaller, mixed sized stones to create a rock garden. In the end, the bottom layer rail ties remained solid so we actually kept them for our stable base for the larger rocks.
I scoured FB Marketplace for rocks, and ended up finding a large stockpile of them - for free! We travelled 90 minutes round trip, load and unload them, and get them into the backyard, so it sure wasn't sweat free! We do still need some more to fully finish the one side, but it is partially done.
The grasses at the bottom of the garden beds were planted last year, and it is amazing to see how they've filled in. We added a few rock garden shrubs and plants in addition to the couple I salvaged. Taking a mix of river rocks leftover from the firepit border, we edged the stairs and filled in the gaps around the large rocks, then topped it all off with a little more pea gravel.


As for the planter boxes, we really just wanted them to be easy, inexpensive to build and look nice. Remember, they may have to be relocated next year, depending on the larger renovation. Don't worry, I have an idea of where they can go if they don't stay there! :)
Some google research of various DIY plans and I found just what I wanted. I purchased an inexpensive plan set to speed up the process, then customized it for what we needed. We repurposed some old cinder blocks to provide extra support, raise the soil box height, and lined it with heavy duty landscape fabric. Add some good garden bed soil, plant a nice mix of grasses, herbs, and tropical plants and we had ourselves a pretty and aromatic garden barrier.


Next up was the heavy labour: Refitting the paver stones. More FB Marketplace shopping, and we picked up a mix of smaller paver sizes. I spent one night planning it out in my CADD software to come up with a pattern that worked. The very defining factor was the pavers under the pergola posts. They were not moving, period. So the design was built around that, as well as the quantity and sizes of extra stones we had just bought for $60. I had originally envisioned a check pattern of sorts, but we didn't have enough of our smaller stones to do that. In the end we were able to create a band stripe detail, and once they were all pressure washed and filled with sand, and the perimeter edging filled with pea gravel, it looks so much better!
Here was the paver layout:

My Paver Layout - we will finish the small paver edging row on both sides once we have finished the right side rock wall (and they aren't temporarily retaining the river rock and pea gravel slope). :)

As a surprise bonus, when we picked up the extra pavers, they offered us the 4 pieces of step nosing that went with it. Amazingly enough they fit the width perfectly for those 2 top steps I so desperately wanted to replace, but wasn't sure how. A little able adjusting and levelling was all it took for them to work, and now we have nice, stable steps now instead of cinder block holes!

We relocated the BBQ and in its place, for now, is an old metal cabinet we've had for years. It's been a bedside table for me, and then my son, and it's been living in the shed storing bonfire kindling for a couple of years . If it ends up staying, we'll need to repaint it for protection against the elements. I wanted a small cabinet with closed storage for outdoor dog toys. This does work great for that and I like that it has the off-white balancing it from the other side. I added a couple of woven decor pieces that used to be over our family room sofa, and had been tucked away in storage. If the wind allows them to stay, I'll treat them with a clearcoat. Alternatively, I'm on the look out for a tall and narrow cabinet with open shelves on top that I can house plant pots on, but I haven't found the right thing yet.

On the other side of the sliding doors we have kept our existing wall décor and just restyled it. We used an old chair and table to create a little seating area below, which also provides a practical surface to place a wireless speaker for when we need it.
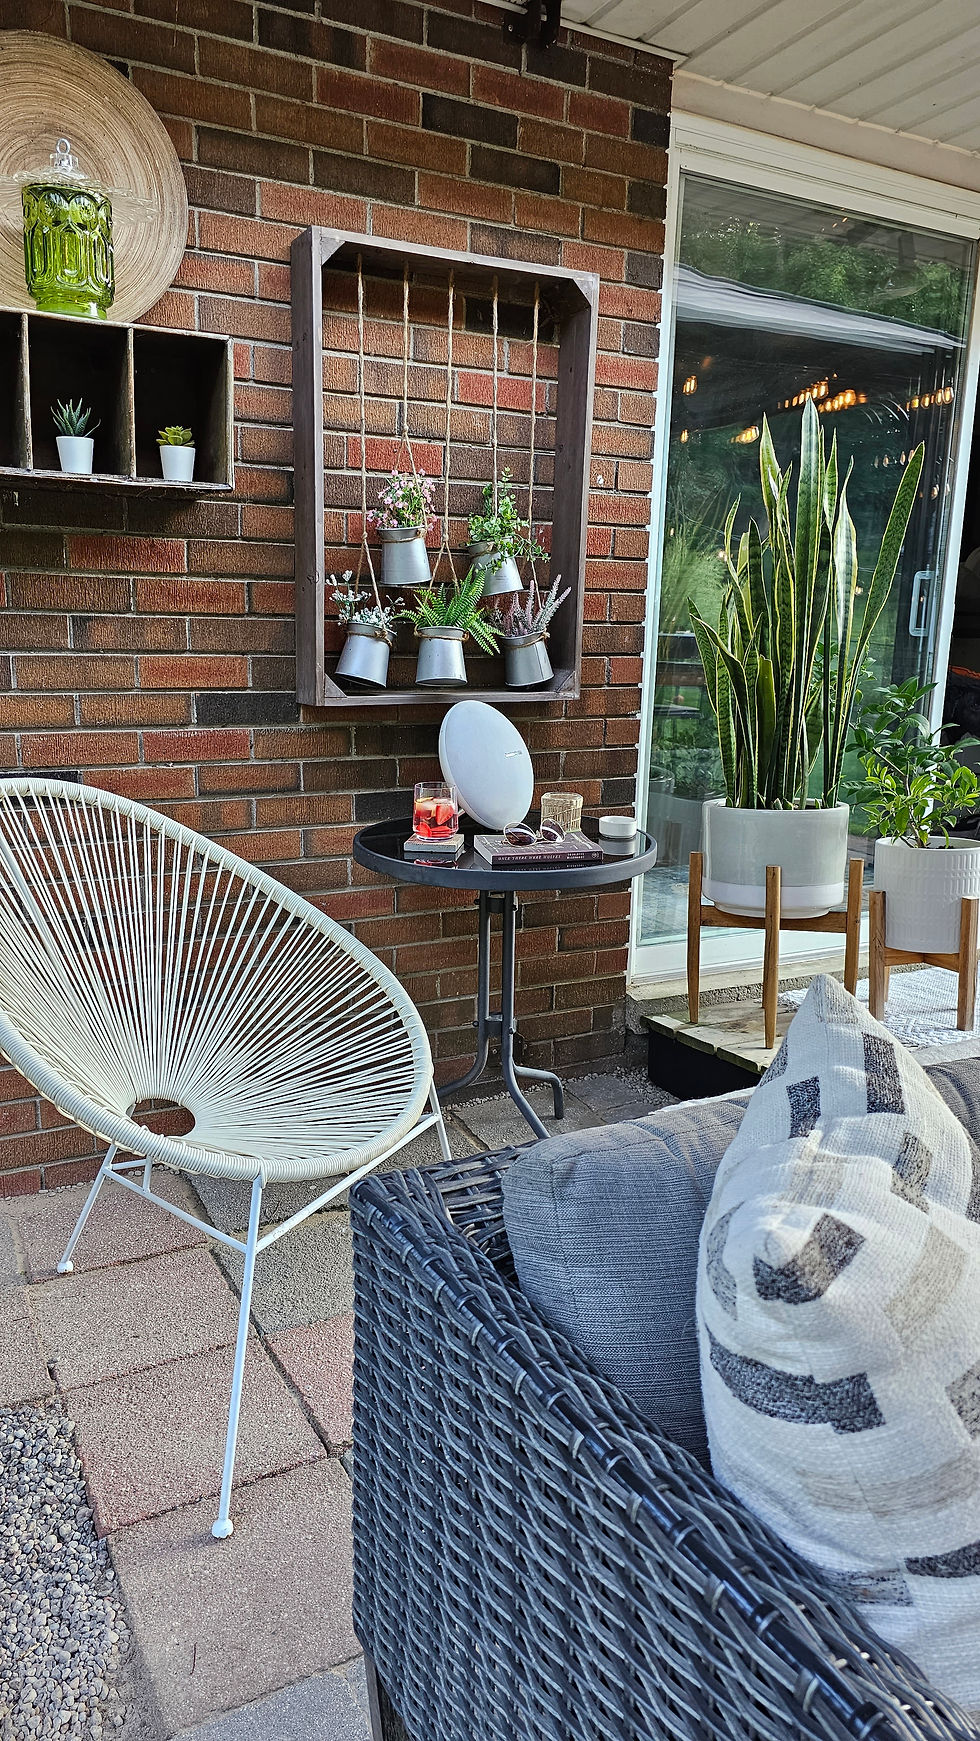
I updated the step with some black paint to carry it through from the shed, our front porch fence and the back rock garden 'dock' (which was the old pool deck we refinished and repurposed). Layering it with a decorative runner and door mat and added existing plants with stands to spend their Summer outdoors, it really makes for an inviting entryway.

We repurposed the string lights that we used for our backyard wedding that had been in storage for far too long, and hung them inside the pergola, then extended them to create a path leading to the shed and BBQ area. It creates a nice soft glow, adding to the northern getaway atmosphere at night.

I knew I wanted to add a decorative light as well, and since I still liked the concept we had before with the two baskets, we went for one larger one. We found this cool basket at Homesense, removed the handles, hot glued in a grommet, and fed the last string bulb through for a soft glow.

Our existing bar height dining table was able to be moved around to the other side now that the BBQ was moved, and we love the new location being beside the lounge seating area instead of behind it. We're ready for Summer entertaining...cocktail and snacks anyone?


Our dogs love the outdoor sofa and chairs just as much as we do, and these cushions and area rug were from our mini-refresh from last year.

Our DIY mini project this year was putting together this cool firebowl. I wanted it to be a large statement decor piece to the outdoor living area while providing a citronella flame to keep the mosquitos away! The next blog post will be a DIY tutorial of how we made it, so sign up for our mailing list if you want it sent right to your inbox.

Check out the Reveal Video below!
I hope you found it inspiring and insightful getting a glimpse into our design assessment and process so you can learn for your own home projects!
And we'll be spending as much time as possible out here on our patio, so it was all worth it!
Yours in Design,


Comments